Showing posts with label Making Memories. Show all posts

Friday, 24 October 2008

Happy Birthday to Vicky!


It was Vicky's birthday yesterday, but I actually gave her this on Tuesday. This is a mini-file box, 6 1/2" wide by 5" high, and it started life as mountboard, coloured cardstock, and an A3 sheet of watercolour paper! Craft TV Weekly had this as one of their webisodes, and I knew straight away that I wanted to make one for Vicky as a present. Naturally I wanted to get really inky, so I made the patterned paper with the watercolour/craftmat technique (clear embossing first to create the white pattern) and stamped it to within an inch of it's life. It is not a project to make in a hurry, but I am so pleased with the result that I may make myself one if I ever get the time!

Colour: Vivid inks, Glimmer Mists, Versamagic, Versacolour, Brilliance
Stamps: All Paperartsy
Other: Bazzill and SU cardstock, mountboard, watercolour paper, lots of PVA glue, velcro for closure (the magnet I tried to use wasn't powerful enough), Making Memories ribbon buckle.

Tuesday, 29 April 2008

This Month's ATCs


The theme for this month's ATCs over on UK Stampers was 'Incorporating a tag', and I actually started these with two weeks to go before the deadline, as I was feeling inspired. Not like me at all, (the early start, not the inspiration!) as I usually find that time pressure helps me to work. However, I found once I started that I was *really* inspired, and took my time over these. I am really pleased with the outcome; I really feel that I expressed myself artistically, and I can't believe I made them! Let's hope it wasn't a fluke ;-)
I even made a slide show, so all of the hidden details can be seen:


Colour: Distress Inks in Broken China and Vintage Photo, Versafine, Moonshadow mist, Silver detail embossing powder, Cosmic shimmer lustre pearl embossing powder
Stamps: Paperartsy, Inkadinkado, Crafty Individuals
Embellishments: Star gems from Hobbycraft, Turquoise gems by Pebeo, pins, beads, wire, and ribbon from my stash
Other: Sizzix originals tag die, Sizzlits mini-tags die, Making Memories metal sheets (used to make mini-tags), Vellum from Lakeland, Silk dupion from Fabric Land, Vintage paper from old book
Thanks for looking!

Wednesday, 20 February 2008

Happy Birthday, Jill!


This card is quite exciting for me, as it is the first card for ages that I have made which didn't involve colouring in and cutting out. It was like eating pie and mash after a month of gourmet meals; a total comfort! I do love all of the complicated things, but actually, I also love the simple style, too. And this was simple to make, even though there are lots of elements. This is the first card I have blogged which uses Stampin' Up stamps: this set is 'Carte Postale', and I need to say thank you to Lorna and Cliff, my Parents-in-Law (who live in France) as I bought these stamps with the money they sent for my birthday.

Stamps: 'Carte Postal' from SU (background, sentiment, tile), Hero Arts (script stamp used on flower etc)
Colour: Versafine in Vintage Sepia
Paper: Plain card embossed with Cuttlebug folder
Embellishments: Embelliscrap swirls and heart, Prima flower, Making Memories brass label holder, ribbon from my stash
Other: Ranger Crackle accents used on tile and sentiment. I highlighted the cracks using Distress Ink in Vintage Photo. Effective, eh?

I completed my scrap page last night, and I think it's one of the best I have done for ages. I always acheive a lot when I go to Vicky's to scrap, and she always does when she comes to me. I think that if you are leaving your craft room to go elsewhere, you put more thought into a project and therefore have done more of the hard work of planning before you start. So we are going to try to alternate who goes to whom, and then I'll at least have a decent finished page every other time I scrap! I'll show you last night's page later...

Tuesday, 28 August 2007

Scrapping some photos!


I have taken so many photos over the last year or so, and every time I download them onto my laptop I think "That will make a great layout!". Of course, I tend to spend my craft time stamping, as I just love playing with inks, but I have finally bitten the bullet and done a page. And there is stamping on here, honestly!
This page is in the 8 1/2 x 11" landscape format, to go in my new Papermania album. The cardstock is Bazzil, and the patterned papers are Junkitz and Basic Grey. The chipboard letters are Making Memories, painted with orange acrylic paint then stamped with my Judikins circles cube. I had to paint over the stamping with a couple of coats of acrylic, then I added Glossy Accents to make the balls effect. The metal letter brads were black inside the letters, I used a Sakura Stardust pen to go over the black, and used a punched heart over a 'v' (I figured it wouldn't be missed!). Anything else was from my stash, which I really have to use before I get anything new!
I enjoyed doing this layout. I have always struggled a bit with 12" x 12", as it is not an instinctive shape to design around. After all, most magazines, books, and paintings are rectangular! I can see myself doing some more pages soon, I have got a whole album to fill!

Sunday, 29 July 2007

New header.

As you can see, I have finally got around to making a few little changes on here, just little tweaks to make it a bit nicer. This is partly thanks to Godelieve, as she has a blog devoted to helping us novices with improving on the original template.
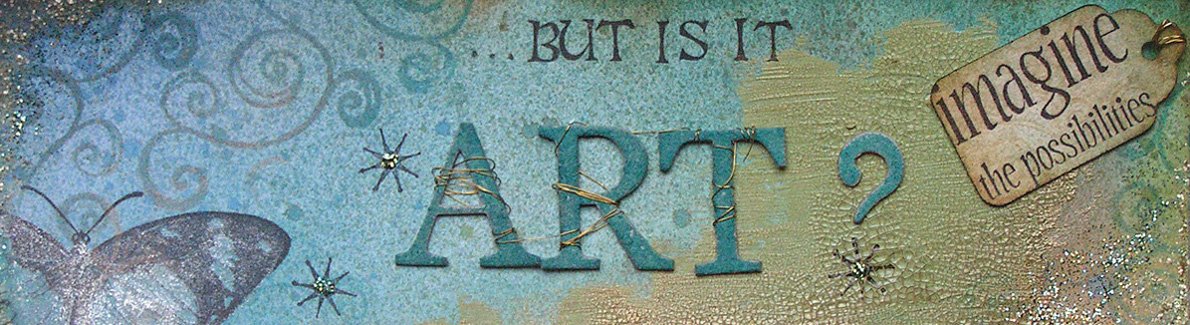
I've been planning this header for ages, I have just been so busy with other projects that I kept putting off making it. I wanted to use all of my favourite stamps and techniques, to reflect the general content here. So, stamp-wise, you will see my Cherry Pie and Aud Design swirls, Hero Arts script, PSX alphabet, Cherry Pie face and a butterfly stamp (Rubbadubadoo). The background was made using the craft mat/water technique and Distress Ink in Dusty Concord plus Nick Bantock Dye Ink in Damson Plum. All of the black stamping was done using Versafine, and the golds were either Perfect Pearls on Versamark or Gold heat embossing on acetate. The chipboard letters are from Making Memories and were coloured with Brilliance Inks, the gold swirl is 7Gypsies, and the flower is Prima.
Oh, and if anyone is interested, the name of this blog is from an ATC I did for one of Isa's challenges, which said "I like it...but is it Art?" It refers to the interesting question for stampers, that since we are using someone else's images, is it art? Or maybe it should be "Whose art is it anyway?"

Sunday, 8 July 2007

My first project with the Bind-it-all.


Here is some artwork, at last! This project took three evenings, but there was a lot of work in it! I was inspired to make this for my Husband by the Making Memories 'Poolside' chipboard alphabet which forms the 4 solid pages of this book. There are also 4 clear plastic pages, thanks to two old Sizzix embossing folders which I didn't need for their original purpose. These have the popped-out letters attached to them. It has made a really chunky book; I had to use the 1" binding wires.
First I made two co-ordinating papers to cover the chipboard with. I used the Nick Bantock dye inks as my starting point, and used the usual craft-mat/water spritzer technique I have used on previous backgrounds. One used the Prussian Blue and Cerulean Azure, the other also used the Chartreuse Green. I stamped over these with various oriental stamps from Blade Rubber and Paperartsy, plus my favourite Cherry Pie swirls. I added accents with Versamark and Perfect Pearls.
The front of the chipboard pages were inked with the Prussian blue ink and covered with the green paper, then the letters cut out with a craft knife. I sanded the edges then used gold Krylon pen to finish them off. I did the same in reverse with the popped out letters, using the turquoise paper. The reverse of these was inked with the two blue inks, stamped with Versamark and the swirls stamp, then Perfect Pearls added.
Then I punched the pages! This was easy, although I had to line the pages up carefully because I only wanted to use five holes instead of six. The machine had no problems going through the chipboard or plastic. I laid the plastic pages over the chipboard pages and glued on the letters with glossy accents, with the right side to the plastic.
The covers were easy, just two pieces of mountboard cut to size, then covered with the turquoise paper. On the front cover I also attached the cut out green paper letters from the inside pages, then added ribbon and a shrink plastic dragon embellishment and a Chinese jade charm. I used navy cardstock on the reverse after adding the ribbon, to cover the raw edges. I then punched the covers, finding it a little difficult to get through the extra two layers of ribbon, but achievable with a bit of extra pressure.
The binding was the easies part, just set the machine and pull the handle. I only have white wires at the moment, but I will be adding to my collection. Oh and one last thing before I assembled the book: I sprayed everything with Matt artists varnish, as my fingers were covered in blue ink from handling the pages. Not good for a present!
I'm very lucky that my Husband appreciates these creations, this book has no purpose other than to look pretty- oh, and keep me occupied for three evenings!

Thursday, 5 July 2007

Finally I can show the photos!


Kym has now received this so I can stop teasing and show the finished book! This is my contribution to UK Stampers Velvet-ize swap. It's a bit hard to work out how this book works, until you follow the instructions and make it. It is a 6" square book when closed, but it has two front covers which sit one on top of the other, so that when they are open the book is 18" wide. The inside pages also fold on top of each other, and have fold out flaps, whew, it does sound complicated! Luckily the instructions from Craft TV Weekly are excellent, so it was pretty easy to put together.
The details of how I made the background paper are on a previous post here, and the instructions for the book are here at Craft TV Weekly (you will need to join to download the PDF, but it's free). To embellish, I firstly used a sponge and Distress Ink in Dusty Concord to add colour around the edges of the covers, inside and outside. I made tags and a pocket for them inside the covers, and printed off the quotation on vellum, which is inside the chipboard frame. The flowers are also sponged with Dusty Concord Distress Ink. The paper on the back of the inside pages is from K and Co, sponged again. There are several slide mounts, coloured and stamped to match, then the rest of the embellishments are from Dovecraft (chipboard), Prima (flowers) and Making memories (all of the metal items). All of the ribbon is from my stash.The spaces are for Kym to add photos or vintage images, whatever she likes really!
I loved making this book, although it was a little nerve-wracking to make for someone else, especially someone whose work I really like! I am now planning to make one for my Husband as a delayed birthday present, and fill it with photos of him with the baby. I will show it when it's done!

Monday, 4 June 2007

Paris mini (name badge) album


This is what I was working on last night, the Name badge album challenge from UK Stampers. Basically, it is a really small mini album, 8.5cm wide by 5.5cm deep, using security badges from a stationers as page protectors. The original, from Craft TV Weekly, used slightly bigger pockets, but this was all I could find on the high street. I have chosen the theme of my favourite places in Paris, and I'm using photos from my visit in 2004, for my tenth wedding anniversary.
As you can see, the first pair of pages is of Notre Dame de Paris. Our hotel was in the Quartier Latin, and each morning we took our croissants, crossed over the river Seine, and ate them in front of the cathedral. Lovely memories!
Enough of the reminiscences! The background papers were made using an 'aged newsprint' effect in Paint shop pro, then stamped with a script stamp from Hero Arts, and swirls by Aud Design. The brads are all Making Memories. I haven't scrapped for ages, as you see my style is 'cluttered' as I love embellishing!

I have used some of my lovely caught in crystal background, but I know that trying to photograph acetate in artificial light just doesn't work, so I will post the photos tomorrow!