Showing posts with label Shrink plastic. Show all posts

Thursday, 26 March 2009

Mother's Day


Before I start describing the top card, I just want to say that it wasn't that colour! My Mum loves coloured card, and so I used a soft turquoise card as the base. I have tried to get the colour back using various editing tools, and it wasn't happening, so I am sorry, you will have to imagine the real colour.

Anyway, this is the card and stampbord brooch I gave to my Mum for Mother's day. I used my new Elusive Images plate, which I absolutely love- expect to see a lot more using it as it is really versatile.

Colour: Card: Distress Ink, Whispers Dye Ink, Versafine (used on acetate then embossed), aurora ep, Sakura glaze and Stardust pens, Stickles; Brooch: Dee Greunig Blending Blox, Whispers Dye Ink, Stickles, Sakura Stardust Pens, Stazon, Opals UTEE, silver Paint Dabber
Stamps: All Elusive Images
Other: transparency, shrink plastic, wire, brooch back, blue card, Stampbord, butterfly charm.


I also wanted to share with you my own Mother's day card, made by my little budding artist. Inside it says 'Remember when you do my washing that I love you'. Bless! I couldn't eat the cookie as I am gluten intolerant, but my little boy was more than happy to eat it for me :)

Sunday, 25 January 2009

Colours CJ- Morti's purple book


a

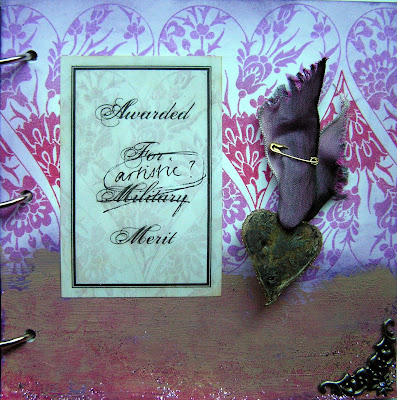
Here is my second journal entry for this new CJ I am in. I can definitely say that this one is more challenging than the last as thinking of a colour theme that fits the stamp is hard! I love a challenge, though, so here is my entry in Morti's book. I was thinking of 'purple heart' for a while, and had decided how I wanted to do the background, but my original idea was to pin a tiny 'medal' to the art doll's chest. Well, as you can see, I was a little rough when cutting out, and pulled the poor creature's arm off! Perfect really, as she then was really a wounded soldier! The real purple heart medal has the phrase 'For Military Merit' inscribed on the back, so I had to change it to 'artistic merit'.

Colour: Dee Greunig Blending Blox, Distress Ink, Distress Crackle paint, Stickles, Versafine, Glimmer Mist, Stazon, permanent fineline pen, Liberon gilt wax
Stamps: Elusive Images, plus Morti's Paperartsy art doll
Other: Shrink Plastic, metal corners, ribbon, safety pin, all from my stash.

When I made the shrink plastic 'medal' I stamped on one side with Stazon, then sprayed the other with Glimmer Mist, not realising that the GM and the Shrink are not completely compatible! The back (the side I sprayed) has a very bobbley texture, and you can see this distorted the shape of the piece, too. However, I love the effect, as it looks less new and perfect than usual, so I may try this again!

Friday, 26 December 2008

All of my Christmas cards

This is all of the cards sent this year (minus a couple I forgot to photograph). The stamps are all Paperartsy and Cherry Pie, and I used all of my favourite products and techniques on them. Thanks for looking!

Wednesday, 15 October 2008

Little Art Doll for a Swap


This is my first attempt at a shrink plastic art doll, so please be gentle with me! I think it's mostly OK, but I am not pleased with the face. I do like it from behind, though- do you like the grungeboard wings? It's such great stuff to work with. The tassel skirt was inspired by an art doll by Linda Baldock, although with hindsight I should have been more generous with the fibres. Oh well, you live and learn!

Colour: Versamagic chalk inks, Stazon, Stickles, Sakura Souffle pen, Versafine, Aurora embossing powder
Stamps: All Cherry Pie
Other: Prima flower, Grungeboard wings, wire, Lucky Squirrel shrink plastic, gem

Friday, 5 September 2008

4" x 4" page and charm


Someone I know from UK Stampers has been very sick, in hospital, for some months. She became ill with a very rare disease (not cancer) a few months into our CJ, and has only just reached the point of having one short day out of hospital. She has a very good friend, Sarah, who has organised a way of us stampers saying 'we miss you- get well soon', which is a charm bracelet with each of us making a charm, plus a 4" x 4" page which will show her who made which charm. I am not a jewelry maker, although I love playing with shrink plastic, and I definitely love working on 4" x 4" pages!

Colour: Glimmer Mists, Distress Inks, Perfect Pearls, Brilliance Inks, copper embossing powder, Stickles, Moonshadow Mist, Paint Dabbers
Stamps: Elusive Images
Other: Caught in crystal background (click on the word in my label cloud for more on this), acetate, old book page, florist's wire, Papermania jewelled brad, Sizzix tag die, Crackle Accents, Cuttlebug embossing folder, semi-precious gemstone beads (sorry, I have forgotten what they are!), jewelry findings, shrink plastic.

The panel on the top of the page is inspired by Arts and Crafts ceramics, and the Cuttlebug panel is my version of faux aged copper. It looks even better in real life!

The original inspiration for this charm project is here
. Scroll down the page and you will find it near the end. What a great idea; Thank you.

Thursday, 21 August 2008

Glenda's Stampbord Challenge


I am a regular reader of Glenda Waterworth's blog (as so many are- it's number 9 on the Crafty Blogs listings site) and recently she set a challenge with the chance to win some gorgeous new stamps. Those who stop by regularly will know that my current favourite stamps are the Elusive Images words set with all those fab quotes- I have used them for most of my recent projects! I also have a couple more sets, and a wood mounted mandala stamp, which I haven't used since last Christmas. Well, to stop the rambling, Glenda's challenge is to produce something using Elusive Images stamps plus Stampbord, and this is it- a star ornament for my Christmas tree! I haven't had time to look at the other entries, but I am sure they are all beautiful and inspiring. As soon as I have finished this, I'm off to admire!

Colour: Glimmer mist, Dee Gruenig Blending Blox, Paint Dabber, Sakura Stardust pen, Ranger Stickles, Cosmic shimmer embossing powder, Versafine, Versamark
Stamps: Elusive Images
Other: Shrink Plastic, acetate, Stampbord, ribbon and star eyelet from my stash.

The star itself is made by stamping the mandala onto acetate, heat embossing, then spraying three times with Glimmer Mist, leaving it to dry each time. Then I cut it into six triangles, flipped it over, and re-arranged it as the star. I did this twice, and layered them back-to-back. The front Stampbord is a Versamark resist, and the back is heat embossed before colouring, to get a stronger image.

Thanks for the challenge, Glenda, I really enjoyed making this!

Saturday, 12 July 2008

Altered Pringles tube


Would you believe this used to be a Pringles tube? Sid had the idea of doing a swap based on the idea of altering said tubes, and I hosted the swap on UK Stampers. It was quite a challenge to come up with a good idea, as I usually only decorate flat surfaces. I ended up buying some Windsor and Newton Galleria Modelling Paste, and used it to add texture to my tube, before using a silver paint dabber and alcohol inks over the whole thing (See Isa's blog for a step-by-step tutorial of this great technique). I then did my latest favourite technique, which is to use paint dabbers over metal foil which has been embossed with my Cuttlebug, wipe some of the paint off, then spray liberally with Glimmer Mist. The photos aren't brilliant here, as the light was appalling that day, but it looks a bit like distressed enamelling. Love it! I have another piece, also part of a swap, which uses the same technique, and tonight I'm making 'metal' themed ATCs, so guess what I'll be doing...

Colour: Alcohol inks, Paint Dabbers, Glimmer mist, Distress Ink, Versafine, Clear Sakura Stardust pen, Brilliance Ink (for edging)
Stamps: Tanda (alphabet), Cherry Pie (art), free love stamp
Other: Stampbord, felt from the alcohol ink applicator (perfect colour match!), silver-coloured wire, silver-coloured beads, newspaper, rock-crystal bead, butterfly heat-embossed on acetate (like the one on my header!), shrink plastic.

The swap was great fun, and this is the slide show. I got Petra's little tube, and I'm using it to store my mini-misters!

Thursday, 31 January 2008

2 More ATCs


I did these ATCs last week, but I had a tummy bug that wiped me out for a couple of days! After feeling better from that, I had to catch up on all of my housework etc, so this is my first opportunity to post these pictures. As you can see, I'm still inspired by my new Paperartsy stamps, and I also had some fun with shrink plastic and heat embossing.
All details as previous post.

Tuesday, 22 January 2008

Love ATC

I love these new Paperartsy stamps sooooooo much! I am inspired by them at the moment, and I'm trying to make all of the things I can see in my head before I forget them! My DH is in Penzance at the moment, so that's helping. The house is tidy, the baby is asleep, and I'm just about to go do some more stamping now! Daytime stamping, how decadent!
This ATC is for UK Stampers January swap, which is an open theme. I have prepared the backgrounds for the other two I need to make. Hopefully I'll be able to post them tomorrow- day and night stamping!
Stamps: Paperartsy
Background: H20s
Inks: Brilliance
Other: White embossing powder, Polyshrink shrink plastic, and wire, ribbon, and letters from my stash.

Sunday, 8 July 2007

My first project with the Bind-it-all.


Here is some artwork, at last! This project took three evenings, but there was a lot of work in it! I was inspired to make this for my Husband by the Making Memories 'Poolside' chipboard alphabet which forms the 4 solid pages of this book. There are also 4 clear plastic pages, thanks to two old Sizzix embossing folders which I didn't need for their original purpose. These have the popped-out letters attached to them. It has made a really chunky book; I had to use the 1" binding wires.
First I made two co-ordinating papers to cover the chipboard with. I used the Nick Bantock dye inks as my starting point, and used the usual craft-mat/water spritzer technique I have used on previous backgrounds. One used the Prussian Blue and Cerulean Azure, the other also used the Chartreuse Green. I stamped over these with various oriental stamps from Blade Rubber and Paperartsy, plus my favourite Cherry Pie swirls. I added accents with Versamark and Perfect Pearls.
The front of the chipboard pages were inked with the Prussian blue ink and covered with the green paper, then the letters cut out with a craft knife. I sanded the edges then used gold Krylon pen to finish them off. I did the same in reverse with the popped out letters, using the turquoise paper. The reverse of these was inked with the two blue inks, stamped with Versamark and the swirls stamp, then Perfect Pearls added.
Then I punched the pages! This was easy, although I had to line the pages up carefully because I only wanted to use five holes instead of six. The machine had no problems going through the chipboard or plastic. I laid the plastic pages over the chipboard pages and glued on the letters with glossy accents, with the right side to the plastic.
The covers were easy, just two pieces of mountboard cut to size, then covered with the turquoise paper. On the front cover I also attached the cut out green paper letters from the inside pages, then added ribbon and a shrink plastic dragon embellishment and a Chinese jade charm. I used navy cardstock on the reverse after adding the ribbon, to cover the raw edges. I then punched the covers, finding it a little difficult to get through the extra two layers of ribbon, but achievable with a bit of extra pressure.
The binding was the easies part, just set the machine and pull the handle. I only have white wires at the moment, but I will be adding to my collection. Oh and one last thing before I assembled the book: I sprayed everything with Matt artists varnish, as my fingers were covered in blue ink from handling the pages. Not good for a present!
I'm very lucky that my Husband appreciates these creations, this book has no purpose other than to look pretty- oh, and keep me occupied for three evenings!

Wednesday, 6 June 2007

Shrink plastic embellishments


I didn't do an awful lot last night, I mainly tidied up after my mad tag-making session of the night before. I am obsessively organised with my craft storage, but when I get crafting, I think I get out practically everything I own and leave it in my working space of 1m x 0.5m! But then I do have the satisfaction of putting it all back in the right place and in the correct order. I also finished cutting out my unmounted stamp sheets and putting them away (in order, of course) in CD cases. I had just cut out the ones I wanted to use, so I am now up to date and organised.
What I did do last night was make some little embellishments to go on my black and white inchies. Practically all of my embellishments are coloured or at least metallic, and I thought I would be a purist here and only use black and white. So out came the shrink plastic again, and I stamped a variety of images in black Stazon on the white, and Brilliance Moonlight white on the black. Stamps used are from: Tandastamps, Anna Griffin, Aud design, Cherry Pie, Stampendous. I think that's all of them!

Saturday, 2 June 2007

The Naming Day is over...


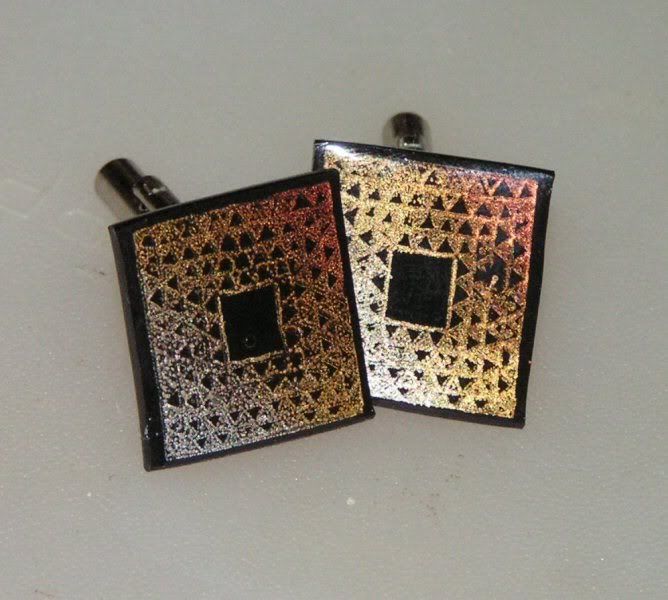
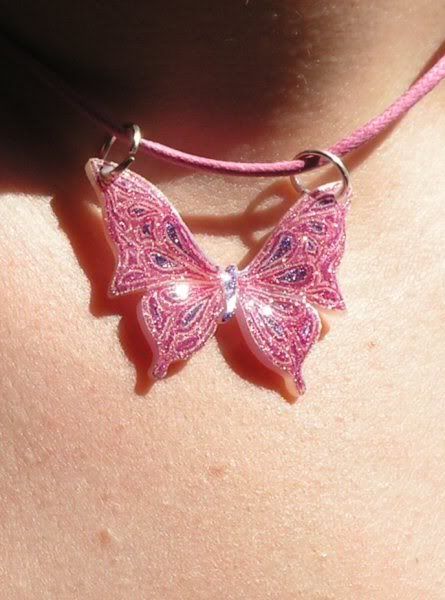
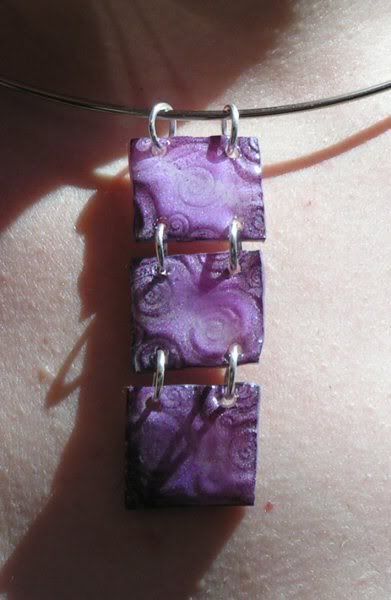
... and I can post pictures of the jewelry I made as presents. They were all done with shrink plastic and Ranger glossy accents, two of my favourite products to play with. The butterfly necklace was made for my 4 year old niece, as she took part in the ceremony, and was a stamped image from Fourth Dimension, coloured with Sakura Stardust pens and shrunk. The cufflinks were presents for the Godfathers, my Brother and Brother-in-law, and were made using a stamp from Cherry Pie, stamped in Brilliance mineral trio on black shrink plastic (there were two sets!). The other necklace was for the baby's godmother, my friend and crafting buddy, and was made by dabbing brilliance in pearlescent purple, crimson and moonlight white onto transluscent shrink plastic, then stamping into the shrunk square whilst still hot with another stamp from Cherry Pie. All of the pieces were given a layer of glossy accents, to protect the images and to add some dimension.
If anyone is in doubt over having a traditional christening, I would definitely recommend a Naming Ceremony as a great alternative, it was quite a day! And the best thing is that I have photos and messages for the baby which I can now make into a lovely star book!