Thursday, 30 August 2007

Wednesday Stamper- Blue


This week's Wednesday Stamper theme is blue, which is one of my favourite colours, and I immediately knew what I wanted to do. Well, this is almost what I had planned. This is a new stamp from Non Sequitur, and I was planning to get complicated and heat emboss, watercolour, and generally phaff about. I stamped the image first of all, to check how much pressure I needed etc (this is a huge stamp!) and... I love it plain! It almost feels like cheating, to just stamp an image in one colour, but how could I improve on the beautiful design. If you click on it you will see there are loads of tiny dots, it is very detailed.
I did mess around with the background, it is the usual craft mat/water technique, only this time I sprinkled on some Perfect Pearls before spritzing with water. It has created drifts of subtle shimmer, a bit like a clouded sky in the moonlight.
Sadly my camera is not too happy with blue tones, and every photo I took came out turquoise! The actual card is a much darker blue. I found that if I tilt my laptop screen away from me, the colour is perfect!
The swirl stamps are also Non Sequitur, the silvery ones are stamped with Versamark and brushed with Perfect Pearls. The main image is matted onto some pearlescent and plain cardstocks, and I added a navy blue ribbon. Oh, and the stamping and background were done with Nick Bantock Dye Ink in Prussian Blue, just like my hands last night!

Wednesday, 29 August 2007

Guess which challenge I've been doing!

Nick Bantock Dye Ink in Prussian Blue, plus Perfect Pearls. Yummy!

Think Monday, Think ATC- Metal

I have taken a couple of weeks off from doing challenges, as I felt like I was stretching myself a bit thin. I don't know why, but now the weather has turned more Autumnal, I feel like my energy has been renewed. So here is my entry to this week's TMTA, the theme for which is 'metal'.
The background of the ATC is the one I made before using the tape-lifted text technique, which was then coloured with alcohol inks. I stamped on it using a maple leaf stamp from Cherry Pie Art Stamps and black Stazon. When I made the background, I had also used the alcohol inks to colour some acetate. I stamped and embossed the acetate using the leaf stamp and gold embossing powder, and cut out the top half of the leaf. I layered this over the background to get a more intense colour, and added the leaf brads (Dovecraft, I think) and the corner embellishment.
It has turned out very textural again, but I like it! Autumn, I'm ready for you!

Tuesday, 28 August 2007

Scrapping some photos!


I have taken so many photos over the last year or so, and every time I download them onto my laptop I think "That will make a great layout!". Of course, I tend to spend my craft time stamping, as I just love playing with inks, but I have finally bitten the bullet and done a page. And there is stamping on here, honestly!
This page is in the 8 1/2 x 11" landscape format, to go in my new Papermania album. The cardstock is Bazzil, and the patterned papers are Junkitz and Basic Grey. The chipboard letters are Making Memories, painted with orange acrylic paint then stamped with my Judikins circles cube. I had to paint over the stamping with a couple of coats of acrylic, then I added Glossy Accents to make the balls effect. The metal letter brads were black inside the letters, I used a Sakura Stardust pen to go over the black, and used a punched heart over a 'v' (I figured it wouldn't be missed!). Anything else was from my stash, which I really have to use before I get anything new!
I enjoyed doing this layout. I have always struggled a bit with 12" x 12", as it is not an instinctive shape to design around. After all, most magazines, books, and paintings are rectangular! I can see myself doing some more pages soon, I have got a whole album to fill!

Sunday, 26 August 2007

Better Late Than Never.


These are three ATCs I made for a swap at UK Stampers. The theme was 'image transfers', and I had originally started with an Autumnal theme in mind with this background here. For various reasons, this didn't happen (yet- I still plan to complete this!) and I found myself with limited time, having to do these ATCs with no clue as to what to do! I had a catalogue of beautiful rose images to play with, and no inspiration. But somehow, it all came together, and although I could do better, I think these are OK! They are quite textural, rather than detailed, but do fit with my idea of faded images.
I started with cream hammered card-stock, and stamped the flower (Inkadinkadoo) in Brilliance Inks in Pearlescent purple and crimson, plus a pink pigment ink. Then I coated the card with Windsor and Newton Matt Medium ( which is a gel medium) and added some torn pieces of cream mulberry paper for texture. Then I added my cut-out rose images (from David Austin's rose catalogue, the pictures are beautiful and I can recommend their roses!) to the coated card, face down, and burnished them hard on the back. I then left them overnight to dry, and in the morning rubbed the back with a wet finger until all of the paper came away and I was left with a transparent image of the roses. The transfers were better in some places than others, which fits my idea here, but I will practice for next time! I decided to coat the piece with a gloss medium as it gave the transfers a better finish, then I stamped my Hero Arts script stamp in Ancient Page Sandlewood and distressed the edges. I used Brilliance Crimson on the edges, and finally sprayed with a matt varnish to take the shine down a little.
I think I was surprised at how transparent the transfers actually are, with hindsight I would have been a bit more careful with where I used the Brilliance Crimson, as it overwhelms the images a bit. It was an interesting technique to play with, but I need to experiment more and plan better.
If you want to see some good examples of image transfers, try Carrie and Julie's blogs, they both really know how to work with this artform!

Tuesday, 21 August 2007

My crafting space.


I thought I ought to show part of what I was doing last week, so you can see I really was busy! This used to be my dining room, a small but pretty room with an Italian Rennaissance theme going on, and not too much furniture (and a beautiful rug!) No more! My craft stuff used to be in the living room, which is now the baby's play area. So now we have a craft room/dining room, and I love it! It's still quite cluttered, as I haven't really finished yet, but every drawer is sorted and categorised so that I can instantly find anything I need!
On the right is my collection of unmounted stamps in their CD cases (all of the CD cases on the left contain- Cd's! We have far too many!). They are organised into manufacturer, plate, and theme, but I still have to label the cases. The tall unit next to that holds all of my card and embellishments. One of those drawers is full of ribbon, sorted by colour. I love to just look through it sometimes! The plastic drawer unit holds my paints, inks, and glues. I can just about fit my ink collection in one drawer at the moment, but only because they are neatly stacked. My mounted stamps are in the top drawer, again, they only fit because they are tidy. The drawer is pretty full! My patterned paper is in the plastic case, and my drawing pads are above that. It doesn't look like too much paper when you see it like this, but it is five years worth of stash!
The second picture is my precious button tin. It was given to me when I was young when an elderly relative died, and the buttons in it are pretty old. Occasionally I will use one, but mostly I like to look at the colours and shapes for inspiration. I strung them by type and colour onto lengths of wool when I was in my teens, I have always been obsessed with categorising things!
The last picture is a portfolio which is full of items I have kept or bought to alter. I had better get busy, as there are about twenty things in there! There are a few metal tins, some mini-books, canvasses, a clip frame, some baskets, and a Camembert box! Enough to keep me going for quite a while!
Last night I was *still* sorting, but it is now finished enough that I can do a project. I just have to decide what! After a week off, I don't know where to begin...

Monday, 20 August 2007

Absent for a while- back now!

I don't know what happened to last week! It was a bit manic, starting with the idea of re-arranging our living room space, and ending up with a *lot* of DIY. Unfortunately, my craft space was the casualty in this instance, as firstly everything got piled on the table, then our old TV got stored in the room for a few days. For those with flatscreens, just remind yourself how *huge* an old CRT 32" TV really is! But it's all under control now, and tonight I should be able to craft, which is good as I have some ATCs due for a swap, not to mention half-finished dominoes and backgrounds lurking around.
The best thing is that the baby now has more space, we have a fab new TV, and I am all fired up and ready to stamp!

Saturday, 11 August 2007

West Dean Chilli Fiesta.


As the weather is still amazing here in the South of England, I am making the most of it by going to as many weekend events as I can! In the past, when we were both working, I worked on Saturdays, and was tired on a Sunday. We have many years of weekend fun to catch up on! Dan loves the fresh air too, and we have just bought a framed baby carrier so we can do some more adventurous walking without the buggy.
Today's event was the annual Chili Fiesta at West Dean Gardens in Sussex. There were 80 chili-related stalls plus glasshouses containing 280 varieties of chili! This was set in a very English garden and parkland, so made for an interesting contrast.
I am trying really hard to improve my composition when I take photos. I have a good suite of editing software, and so I am usually a lazy photographer who takes a lot of shots. This time I limited myself, and thought more about the various rules of a good picture. The main thing I notice about my photos is that I need to get in a little bit closer, so the photos you see here were cropped just a bit. I will keep practicing!
Tomorrow is a free open-air concert in another English garden, I will take the camera and see what I can come up with!

Friday, 10 August 2007

Happy Birthday Sara!


It is my friend Sara's birthday today, and last night a small group of us went out...alone! No babies! They were all in the good hands of their Daddies, and suffered no ill effects, of course. This is the card and gift I gave to her, so I can now show the photos.
The canvas was coloured with a mix of Distress Inks and Brilliance. I stamped the image of the Mother and child, and the oval swirls onto tissue and adhered them to the canvas using Klear floor wax. I found it was better to just let the tissue settle onto the wax, otherwise it takes the colour from the canvas if you brush too much. The tissue then turns clear, don't ask me how! I sponged Distress Ink around the figure, but not the ovals, you can see from the photograph the difference this makes. The heart was stamped directly onto the canvas with Brilliance Pearlescent Crimson, then I used the Iridescent Medium to pull the colour into the image. I also used it on the skin of the figure. I stamped the stars in Silver Brilliance, and went over them with my Sakura clear Stardust pen (as recommended by Julie), and I traced over the oval swirls with it. What you can't see is that the edge of the canvas was stamped with my Klimt swirls. All stamps used were by Cherry Pie.
The card came together in stages. The chipboard flowers I blogged about a couple of days ago. The background for the centre panel was made a couple of evenings ago. I used a piece of glossy photo paper and a sea sponge, and just added lots of layers of colour, including a couple of colours of Brilliance. It ended up looking like a piece of granite. I stamped my new stamp, from Crafty Individuals, over this background using Versamagic chalk ink in Eggplant, then added some to the back of the circle flower shapes. The main part of the card was stamped using Ancient Page and an Aud Design swirl at the weekend, then I put it all together, stamped the words (Beach Bum Stamps), and made a little acetate butterfly.
I forgot to photograph the inside and envelope, but with all of my cards I print a sentiment out on the computer, then stamp around it, and on the envelope too, as a little hint of what's inside. I can't leave a surface unstamped! I use softer colours, but keep it co-ordinated. Next time I will remember!

Thursday, 9 August 2007

More Backgrounds, but this time that's all that's required!

I realise that I keep on showing backgrounds at the moment, but this time there is a good reason! I'm taking part in a 3 stage ATC jam at UK Stampers, where three people each do part of an ATC, then send it to the next person etc. (A bit like a circle journal). We've only just started, and so these are my two background, to be sent on to the next person on the list. The next time you see these, they will be unrecognisable!
For these, I used the craft mat/water technique with Nick Bantock Dye Inks in Prussian Blue and Chartreuse Green. Then I stamped in Versamark and brushed with Perfect Pearls. The Blue background is an Anna Griffin stamp with Gold Perfect Pearls, and the green background is a two Non Sequitur stamps with Copper Perfect Pearls. I know these are techniques I use a lot, but I thought it best not to be too experimental when someone else needs to be able to work on these!
I have just received some backgrounds to work on, and they are fab. I need to get my thinking cap on, as I want to do these right! We have three weeks to work on each stage but are ahead of ourselves already. I will work on them this weekend, if I get some time. This stage is quite difficult, as I have to leave room for the last person to contribute.
I have got more photos to show, but tomorrow, as they are for a birthday! I am still out and about making the most of this lovely weather, so the photos are building up a bit, waiting for a big hit!

Tuesday, 7 August 2007

Thanks to Godelieve.


This is another of my half-done projects, but when I am time-challenged I do tend to just do a small project rather than a whole card or page. Last night was not a sleeping night for Dan, so whilst Paul was cooking, I decide to decorate some Maya Road chipboard flowers.
The story behind this is that a few months ago, Godelieve showed a project using the Windsor and Newton Iridescent medium. I looked for it at the time with no joy, and then forgot about it. It gives a finish a little bit like H20 paints, and you can either mix it in or paint it over your painted project. Well, I went shopping to a huge place which stocks a lot of basic craft and art equipment (plus loads of homeware, it's a tempting shop!), and there it was, on the shelf!
Naturally, I had to have it, and last night it was sitting on the table when I got downstairs. Godelieve has also recently decorated some chipboard flowers, the ones from Maya Road which I have had for nearly two years and hadn't used. So I thought: iridescent medium, Godelieve, flowers, and this is the result! I used a mix of Brilliance and Versamagic inks, plus a little Distress Ink, stamped with my Hero Arts script stamp, then over-washed with the Iridescent Medium. I am planning to use them on a card, I have an idea in mind, but let's hope Dan sleeps this evening!

Monday, 6 August 2007

My first commission!


I realise I have been absent from blog-land all weekend. The weather has been too good to be indoors, although I did get some creative time yesterday evening. This card was made for a busy friend to send to her Mum for her birthday. This friend is very creative too, but her baby sleeps even more badly than Dan, so takes up a lot of evening time. It's no fun trying to be productive if you have had no sleep!
I started by doing the craft mat/water technique using Distress Inks in Shabby Shutters, Antique Linen, and Scattered Straw. Then I sprayed with Perfect Pearls mixed with water, and stamped with A Stamp in the Hand's Field of Sky over the whole thing (it looks like a sprayed finish, without the uncertainty!). I stamped with Hero Arts script, Aud Design's swirl, and a Paperartsy butterfly over the background, then edged with Nick Bantock Dye Ink in Damson Plum. I stamped the main Paperartsy image in Damson Plum, and while it was wet dusted Perfect Pearls over it. The card it is matted onto is also Damson Plum Ink and Perfect Pearls. It looks so shimmery in the light! The main card is stamped with the script stamp in DI Antique Linen, then I stuck it all down with added ribbon and an embellishment from my stash.
I should have taken a photo of the envelope and the insert, as I stamped on those using Ancient Page in Sandalwood, as it is waterproof. Next time I will. I hope there will be a next time, anyone want a card?!

Friday, 3 August 2007

Sunset in Hampshire.


This evening I noticed how yellow the light was, and went to look outside my front door. Look what I saw! It was an amazingly beautiful yellow sunset. I don't know what that means in terms of weather, but I know that it would have been very bad to pass up the opportunity to get the camera out. I used the evening setting, and it has truly caught the luminous quality of the light.
I have just finished a small canvas, but I can't show it yet as it is a gift. I have a card to make, which is planned in my head, but tonight I am just luxuriating in the fact that Dan went to sleep at 8pm, so I have some time free to spend with my husband. But tomorrow is Saturday, so I may get some daytime stamping done!

Thursday, 2 August 2007

Think Monday, Think ATC- Loving couples

This week's Think Monday, Think ATC challenge is 'loving couples'. How could I not use this stamp? The original of this is beautiful, but Marina from Cherry Pie has really caught the passion in her rendition for this stamp. Thanks Marina!
The border and text were computer generated, the main image was stamped in black Versafine. The Cherry Pie heart was reverse stamped in Versamark, using the flat plain square from Judikins' 'Carol's Cube' (ink up your stamp, stamp it onto the square, then stamp the square onto your paper. Voila, your image is reversed!). First it was heat embossed with gold detail powder, then I used Versacolour Cardinal Red direct-to-paper over the whole image, poured on clear embossing powder, then heated it. I don't know how this works, but the original embossing comes through the colour! Then I cut out the heart and glued it in position, and mounted the whole thing on black card. Oh, and the lips were coloured with Sakura Stardust then Glaze pens.
If anyone loves fonts, as I do, then check out Dafont.com. There are hundreds of amazing fonts in all different styles, perfect for the finishing touch for your projects. And they're free!

Wednesday, 1 August 2007

Warning- lots of photos!


Yes, these are the results of my play session with my Ranger Alcohol Inks. I have had some for quite a while, but so far have only used them to do 'caught in crystal' backgrounds. In my usual roundabout way I decided to have a go at 'polished stone' backgrounds. Here's the trail...
UK Stampers' new ATC swap for August is technique based this time, so each ATC will use an image transfer of some kind. There are several different methods of transferring an image, about which I am bound to write more another time. I remembered that I had seen an interesting Technique on Trish Bee's Art Venture blog involving lifting text with clear packing tape. She mentions that since this technique leaves you with a shiny surface, Alcohol Inks are the ideal medium for adding colour. So I decided that since I would be getting all of the equipment out, I needed to make a few things.
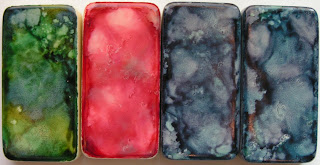
My first attempt was with the greens and blues, and I tried the effect on glossy photo paper. Yuck! The paper is very absorbent, despite the gloss finish, and you cannot 'work' the colours at all. Then I tried acetate, as I had loads of scraps around, and suddenly I could see why people like this effect. As you lay down the inks, the colour moves and changes, so you really don't know what you will end up with. I then grabbed some Dominoes, which Carrie had kindly sent me, and the effects were gorgeous. What a great surface to work on! You can see I tried three different colour combinations before deciding to use the reds on my image-transferred background. I still have plenty to do on that, but it's an interesting start!
Now I have to get around to buying some 'proper' glossy card. I know I need either Kromecote or Astralux to get the best effects. I know where to buy it too, it's just I'll end up buying more than just card! When I get some, I shall gather a collection of things to alter, and really go to town. Hmm, I may have to go and browse the online shops now...!